![]()
Boss & Bonus Guide
| Bonuses |
 |
| General tips |
| 1 The best way of killing things, wherever possible, is the battle strike, You know, the aerial move where you push the joystick up, press fire, then pull the joystick down. Apart from looking rock hard (and thus impressing any of your friends who are watching) it also takes more hit points off the baddies and kills them quicker. |
| 2 There are platforms in the game that you can make swing higher by the following method. Move the joystick downward when the platform is moving downward. Release it immediately when it goes up. If the platform has a very low altitude, use very short joystick strokes to get it moving again. |
| Hidden bonus areas |
| If you check out all these hidden bonuses you should have enough lives and energy to complete the game without any problems. Because you'll probably be able to find a few of them by yourself, only the less obvious and most well-hidden ones are described here. |
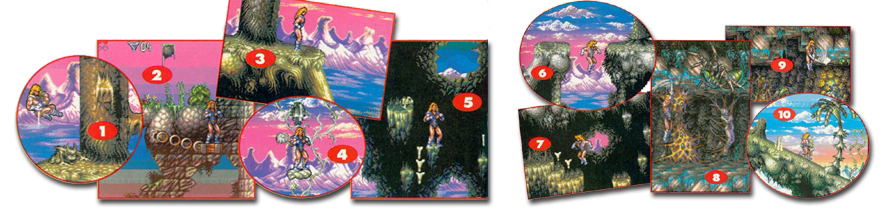
| Level 1 |
| 3-5 On the first 60° slide (the ones so steep that you can't go up again) you can get onto a leaf if you jump in time. From there you can reach the leaf with the two crystals on it. Jump up even further to the highest leaf, jump straight up into the air and wait approximately 10 seconds. After a while a beetle appears which you can jump on to take you up to a massive bonus area which contains loads of energy crystals and two extra lives. |
| 6-7 Just in front of the exit of the first level there is a chasm which you are supposed to jump over. Let yourself fall down there and steer to the right (to the left in HARD mode). Here you'll be able to access another bonus area. |
| Level 2 (First spider cave) |
| 8-9 This isn't hard to get through as long as you're careful. The giant insect can be done away with easily enough. Crouch down right next to it, and when the spider is launched from its hide take a sweep kick at it to finish it off, then immediately jump up and do an overhead swipe on the giant insect's head (by pushing the joystick up and keeping the fire button pressed). Repeat this move and it should be finished off. The spiders on the floor can be dispensed with using crouching side kicks or the battle strike, while the ones on the roof need to be finished off with jumping upper swipes. Treat the final insect just like the first and you'll be sorted. |
| Level 3 (Second swamp level) |
| 10-12 At the beginning of the level there is a 30° slope which leads to a 60° slide. Go back to the clump of thorns, run down the 30° slope to get as much speed as possible and make a wide jump to the right from the edge of the platform at the top of the 60° slide. You should land on a leaf again. From here you can jump further and reach stacks of bonuses to the right, after destroying a few nasties. Note that some of the destructible plants are in the floor in this level and also in the fifth level. Remove the plants with the downward fighting jump (the battle strike) and let yourself fall down into some minor bonus caves. |
| Level 5 (Third swamp level) |
| 13-14 Here you are able to get the second sword before you need to. At the start you're standing in front of the exit of the second spider cave. Go to the left until you appear to have reached the end of this platform, and can see only water to the left. Take a run and jump to the left now. Before you can fall into the water, a leaf will appear right under your feet. Phew! Make another one of these suicide jumps to the left. Another leaf appears. From here you can reach a small cave containing an extra life and the stronger sword. |
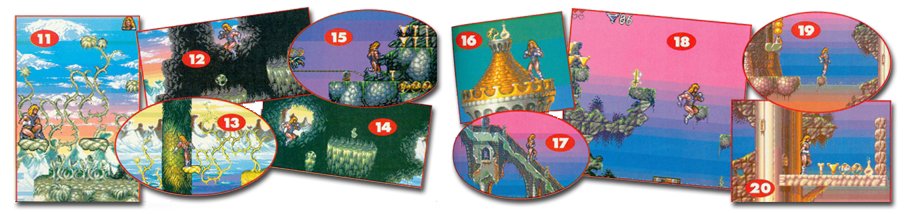
| Level 6 (First ancient city level) |
| 15-16 There are plenty of one-ups (extra lives, in case you didn't know) at the first tower that you encounter (to the right after the start of the level). Kill the swarm of insects. Note the row of steadily hovering insects to the right. By using the downward fighting jump several times, you can use the insects as jump pads to get to the right. Valdyn can climb up the golden roofs of the towers. Try to get on the roofs as often as possible, as many of them (surprise, surprise) give access to bonuses. |
| Level 7 (Second ancient city level) |
| 17-20 After the beginning of this level there's a long 45° slope. Use it to get up speed and perform a huge leap to the right at the end of the slope. Aha! Further to the right you encounter your first swinging platform, which is already swinging. Use it to get higher and higher until you can reach the tiny platform above. The third sword waits for you there. A few screens to the right (after those nasty fire chains) there is a tower with a fire chain at the bottom. Get to the right edge of the platform and let yourself fall down to the right. Surprise! A swimming platform. Get the one-ups and stuff from here and you're doing well. |
| Secret level |
| The strongest sword can be found here, again before you need it. There's a place in this level where you have to handle moving spikes with a stone-ball thrower just behind them. Instead of climbing up to avoid the danger, try to get past the generator and let yourself fall down to the right. Use the hovering ghost as a jump pad just as you did with the insects in level six and get it. |
 |
| Bosses |
 |
| Last month we looked at Lionheart's hidden bonus
areas and the numerous treasures to be found there. But
there are at least a couple more extra lives that you can
easily pick up - if you know where to look for them. On
level 3 (the second swamp level), run past the spikes
that rise up from the floor until you reach the tree at
the far end. On the first platform you'll see a potion
bottle amongst a seemingly impenetrable clump of thorns.
Jump past the thorns (you can't make it in one go, so
you'll lose a heart) and you'll find an extra life. A
helpful beetle will then take you up safely to the next
platform. There's another extra life at the end of the same level. When you come to the tree that takes you up to the next spider cave, don't go up it but carry on along the level. Aha. There it is, being guarded by an insect nest. Now, fortified with as many extra lives as you can find, it's time to take on those end-of-level baddies. |
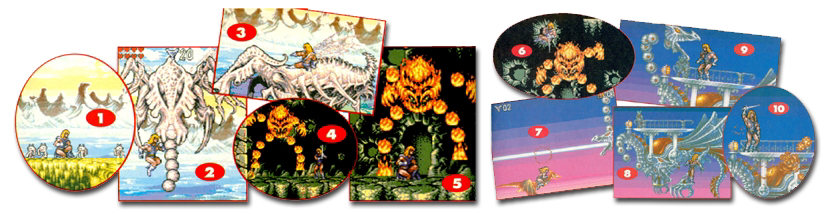
| Giant Insect |
| 1-3 His first attack involves some swinging, er, balls from his underbelly. Just take a swipe at them. Next he drops some eggs, so take on each of the (in fact rather cute) Baby Giant Insects by using the crouching foot swipe. To actually destroy the Giant Insect himself you have to kick the back of his neck. Use the platform birds (the ones you have to hit before you can jump on them) to climb up onto his back, then take shots from there. A hit will cause the insect to change colour and you'll be thrown off. Then keep repeating the process until he's finished off. |
| Fire Demon |
| 4-6 Run to the right and use the platforms there to make several attacks with the downward fighting jump. Jump to the right as soon as you hear the sound effect that tells you that the demon will jump. Then try to get between his feet. Duck when he lands on you, then stand up and hit him from below. Duck again if he comes down for his next jump. As soon as he's jumping again, follow him to get between his legs again. |
| Giant Metal Dragon |
| 7-10 You can detect when the dragon is going to release a beam because he turns his head slightly just beforehand. Fly up, avoid the beam and steer downward and to the right as fast as possible. Watch out for the grenades thrown by the little critter on the dragon's back. Fly under the dragon, jump upwards and climb onto his paws. Attacks from the dragon's head can be deflected by a well-timed sword hit. Climb onto the dragon's back, finish the critter and hit the blinking device in the dragon's neck. After a successful hit to this vulnerable spot, the dragon throws you off. Repeat this tactic two more times and the mighty beast is finished. |
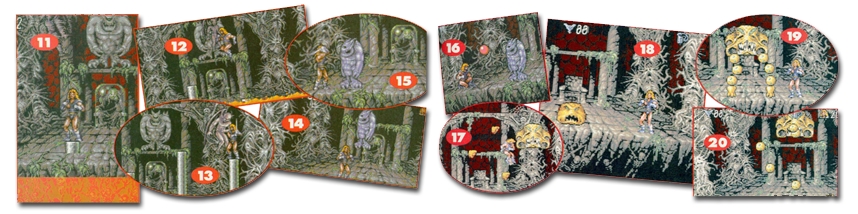
| The Final Showdown |
| You've dealt with everything they've thrown at you so far. But it's no time to relax - there's three more to come! |
| First Monster |
| 11-13 At the beginning, jump onto the second pole from the left. Wait. From here you can make a direct first hit on the enemy. The best tactic for jumping the poles is to wait until one nearly sinks into the lava and then jump to an ascending pole on the left or right. Don't jump around wildly. Prepare for an attack when you hear the scream of the approaching monster. |
| Second Monster |
| 14-16 This one can only be damaged by hitting back his own shots. The trick is to stand quite close to him, otherwise he'll jump over the reflected shots. This fight is rather easy when you realise that the shots are always coming in a pattern of one shot high and one shot low. Just stay in the rhythm and run beneath him when you reach the right or left border. |
| Norka |
| 17-20 It should be rather obvious that you have to use the platforms that Norka keeps spitting out in order to make an attack with the oftmentioned downward fighting attack jump. The real trick is to survive his second attack, in which he rains boulders down on you. Just stand directly beneath him and remain cool. If you're under threat from a boulder falling directly downwards, just hit it with your sword. As soon as Norka stops throwing, run away immediately or he'll drop on you. |
| The Hidden Level |
| Unless you've forgotten, your Lionheart character has
more than just the Lionheart to reclaim and Norka to
defeat. He's also intent on bringing back his girlie. To
do this he needs to find the Magic Amulet to bring her
back to life. And this Magic Amulet is located in the
Hidden Level. The entrance to the Hidden Level is in the volcano level. You might have noticed the square stones that you can move by hitting them with your sword. However, there is a method of moving them when you're standing on them - by using the downward fighting jump (again!). Depending on which side of the stone you hit, it moves left or right. This way you can move large distances across the lava pool. Use this method to get to the right of the screen with the fourth stone. Here you will find a passageway. Go right until you find the entrance. Now fight your way through this hidden cave and collect the Amulet. After all this, when you complete the game you'll be treated to an enhanced end sequence. Hooray! |
 |